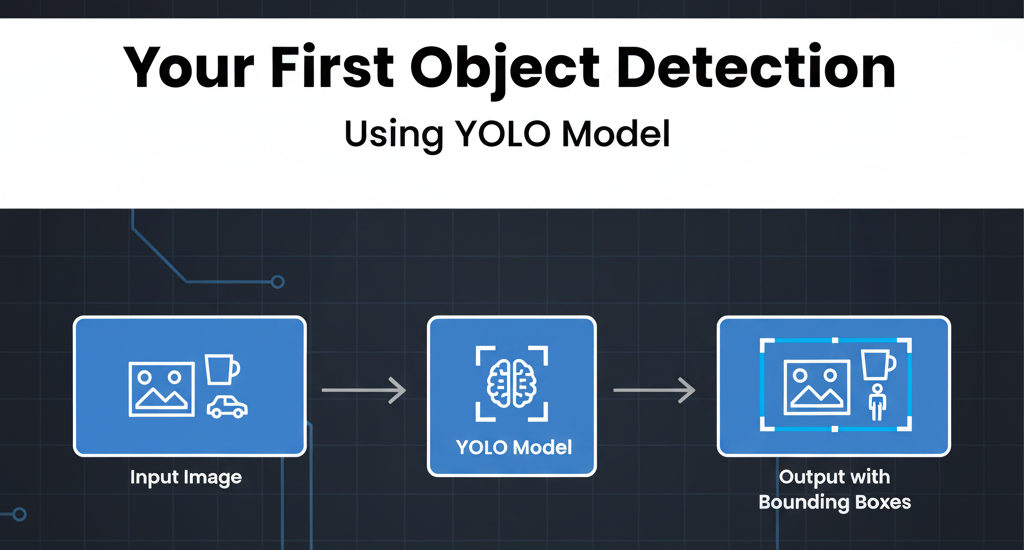
🎯 Your First AI Vision Project in 10 Minutes!
Ready to build something amazing? In this tutorial, you'll create your first object detection project that can identify cars, people, animals, and 80+ other objects in any image - and it takes just 5 lines of code! 🚀
By the end of this tutorial, you'll have a working AI model that can: • Detect multiple objects in any image • Draw bounding boxes around detected objects • Show confidence scores for each detection • Work in real-time on your computer • Identify 80+ different object types (cars, people, dogs, chairs, etc.)
📋 What You'll Need (Don't Worry, It's Simple!)
✅ Requirements:
• Python 3.8+ (Check by running python --version)
• Basic computer (no expensive GPU needed!)
• 10 minutes of your time
• Any image file you want to test with
• Internet connection (for downloading the model)
🤔 No Programming Experience? No problem! This tutorial is designed for complete beginners. Just copy and paste the commands exactly as shown.
🏗️ Step 1: Create Your Project Folder
First, let's create a clean workspace for your project:
1
2
3
4
5
# Create a new folder for your project
mkdir my_first_yolo_project

# Navigate into the folder
cd my_first_yolo_project
💡 Pro Tip: You can also create this folder using your file explorer and then navigate to it in the terminal!
🛡️ Step 2: Create a Virtual Environment (Important!)
Think of a virtual environment like a separate, clean room for your project. This prevents conflicts with other Python projects:
1
2
# Create a virtual environment named 'venv'
python -m venv venv
⚡ Activate the Virtual Environment:
On Windows:
1
2
# Activate on Windows
venv\Scripts\activate
On Mac/Linux:
1
2
# Activate on Mac/Linux
source venv/bin/activate
✅ Success Check: You should see (venv) at the beginning of your terminal prompt. This means you're now working inside your virtual environment!
📦 Step 3: Install Ultralytics YOLO (The Magic Package)
Ultralytics has made YOLO incredibly easy to use. One command installs everything you need:
1
2
# Install ultralytics (this includes YOLO)
pip install ultralytics
⏰ This will take 1-2 minutes to download and install all the necessary components. You'll see lots of text scrolling - this is normal!
🎉 What Just Happened? You just installed: • YOLO models (the AI brain) • OpenCV (for image processing) • PyTorch (the deep learning framework) • All dependencies needed for object detection
📝 Step 4: Create Your First YOLO Script
Create a new file called detect_objects.py and add this magical code:
1
2
3
4
5
6
7
8
9
10
11
12
13
14
# detect_objects.py - Your first YOLO object detection script!

# Import the YOLO model
from ultralytics import YOLO

# Load the pre-trained YOLO model (this downloads automatically)
model = YOLO("yolo11n.pt")

# Predict objects in your image
results = model.predict(source="image.png")

# Show the results with bounding boxes
for r in results:
    r.show()
🔍 Code Breakdown (What Each Line Does): • Line 4: Import YOLO from ultralytics • Line 7: Load the YOLOv11 nano model (smallest, fastest version) • Line 10: Run object detection on your image • Line 13: Display the results with bounding boxes and labels
🖼️ Step 5: Add Your Test Image
You need an image to test with! Here are your options:
Option 1: Use Your Own Image
• Find any image with objects (cars, people, animals, etc.)
• Rename it to image.png
• Place it in your project folder
Option 2: Download a Test Image
• Search for 'busy street scene' or 'park with people and dogs'
• Save the image as image.png in your project folder
📁 Your project folder should now look like this:
my_first_yolo_project/
├── venv/
├── detect_objects.py
└── image.png
🚀 Step 6: Run Your First Object Detection!
This is the moment of truth! Run your script:
1
2
# Run your object detection script
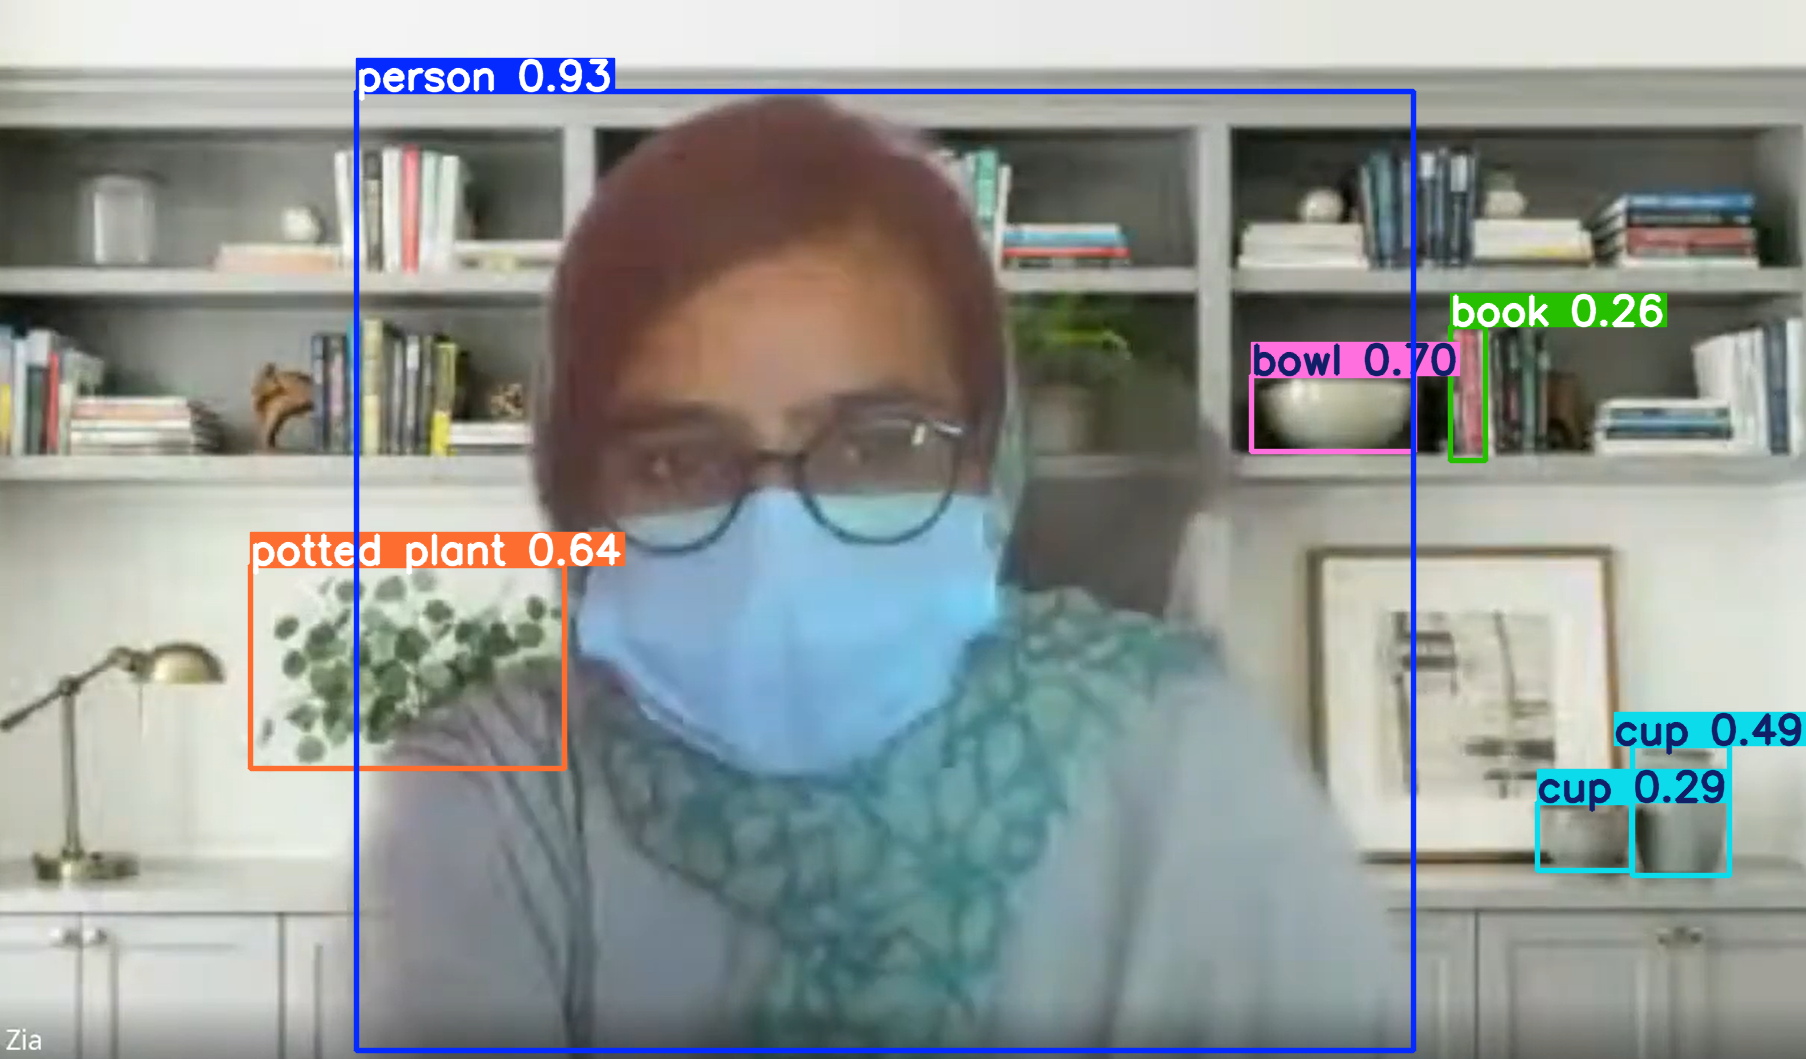
python detect_objects.py⏰ First Run Magic: • The model file (yolo11n.pt) downloads automatically (~6MB) • YOLO analyzes your image • A window opens showing your image with detected objects! • Each object has a colored box and label
🎉 Congratulations! You Did It!
If you see a window with your image and colored boxes around objects, you've successfully created your first AI object detection system! 🎊
🔧 Step 7: Let's Make It Even Better!
Now let's enhance your script to save results and get more information:
1
2
3
4
5
6
7
8
9
10
11
12
13
14
15
16
17
18
19
20
21
22
23
24
25
26
27
28
29
30
31
32
# enhanced_detect_objects.py - Improved version with more features!

from ultralytics import YOLO
import cv2

# Load the model
model = YOLO("yolo11n.pt")

# Run detection and save results
results = model.predict(
    source="image.png",
    save=True,  # Save the result image
    save_txt=True,  # Save detection details
    conf=0.5  # Only show detections with 50%+ confidence
)

# Print detailed information about detections
for r in results:
    print(f"\n🎯 Found {len(r.boxes)} objects in your image!")

    for i, box in enumerate(r.boxes):
        # Get object details
        class_id = int(box.cls)
        confidence = float(box.conf)
        class_name = model.names[class_id]

        print(f"  {i+1}. {class_name} ({confidence:.1%} confidence)")

    # Show the image
    r.show()

print("\n✅ Results saved in 'runs/detect/predict/' folder!")
🌟 New Features Added: • Save results to a folder for later viewing • Print detection details in the terminal • Set confidence threshold (only show confident detections) • Count total objects found • Show object names and confidence scores
📊 Step 8: Try Different Images and Models
Now that you've mastered the basics, let's experiment:
🎛️ Try Different YOLO Models:
1
2
3
4
5
6
7
8
9
10
11
12
# Different YOLO model sizes (trade speed vs accuracy)

# Fastest (but less accurate)
model = YOLO("yolo11n.pt")  # Nano

# Balanced
model = YOLO("yolo11s.pt")  # Small
model = YOLO("yolo11m.pt")  # Medium

# Most accurate (but slower)
model = YOLO("yolo11l.pt")  # Large
model = YOLO("yolo11x.pt")  # Extra Large
📷 Try Different Image Types: • Street scenes (cars, people, traffic signs) • Indoor photos (chairs, laptops, cups) • Nature images (animals, trees) • Sports photos (people, balls, equipment) • Kitchen scenes (food, utensils, appliances)
🎥 Step 9: Detect Objects in Videos (Bonus!)
Ready for the next level? Let's detect objects in videos:
1
2
3
4
5
6
7
8
9
10
11
12
13
14
15
16
17
18
19
20
# video_detection.py - Object detection in videos!

from ultralytics import YOLO

# Load model
model = YOLO("yolo11n.pt")

# Detect objects in video
results = model.predict(
    source="video.mp4",  # Your video file
    save=True,  # Save processed video
    show=True,  # Show live preview
    stream=True  # Process frame by frame
)

# Process results
for r in results:
    pass  # Results are automatically displayed

print("✅ Processed video saved in runs/detect/predict/")
📹 Video Detection Features: • Real-time processing of video files • Live preview window showing detections • Automatic saving of processed video • Frame-by-frame analysis for accurate results
📱 Step 10: Webcam Detection (Live AI!)
The ultimate test - live object detection from your webcam:
1
2
3
4
5
6
7
8
9
10
11
12
13
14
15
16
17
18
19
20
21
22
23
24
25
# webcam_detection.py - Live object detection from webcam!

from ultralytics import YOLO

# Load model
model = YOLO("yolo11n.pt")

# Use webcam (source=0 means default camera)
results = model.predict(
    source=0,  # Webcam
    show=True,  # Show live feed
    stream=True,  # Real-time streaming
    verbose=False  # Less terminal output
)

print("📹 Starting webcam detection...")
print("Press 'q' to quit")

# Process live stream
for r in results:
    # Press 'q' to quit
    if cv2.waitKey(1) & 0xFF == ord('q'):
        break

print("👋 Webcam detection stopped")
🔴 Live Detection Features: • Real-time object detection from your camera • Instant results updated every frame • Interactive experience - wave objects in front of camera • Press 'q' to quit the live detection
🔧 Troubleshooting Common Issues
❌ Problem: 'python' is not recognized
• Solution: Try python3 instead of python
• Or install Python from python.org
❌ Problem: Virtual environment activation fails
• Windows: Try venv\Scripts\activate.bat
• Mac/Linux: Make sure you're using forward slashes /
❌ Problem: Image not found
• Solution: Make sure image.png is in the same folder as your script
• Check the filename and extension match exactly
❌ Problem: No objects detected
• Solution: Try lowering the confidence threshold: conf=0.3
• Use a clearer image with more obvious objects
❌ Problem: Webcam not working
• Solution: Try source=1 or source=2 for different cameras
• Make sure no other app is using your webcam
🎯 What Objects Can YOLO Detect?
YOLO can detect 80 different object types out of the box:
🚗 Vehicles: car, truck, bus, motorcycle, bicycle 👥 People: person 🐕 Animals: dog, cat, horse, cow, elephant, bear, zebra, giraffe ✈️ Transportation: airplane, train, boat 🚦 Traffic: traffic light, fire hydrant, stop sign 🪑 Furniture: chair, couch, bed, dining table 💻 Electronics: laptop, mouse, remote, keyboard, cell phone, microwave, oven, toaster, refrigerator ⚽ Sports: sports ball, kite, baseball bat, baseball glove, skateboard, surfboard, tennis racket 🍎 Food: banana, apple, sandwich, orange, broccoli, carrot, hot dog, pizza, donut, cake And many more!
🚀 Next Steps: Level Up Your Skills
Now that you've mastered basic object detection, here's what to explore next:
🎯 Intermediate Projects: • Custom object detection: Train YOLO on your own objects • Object tracking: Follow objects across video frames • Instance segmentation: Get exact object shapes, not just boxes • Pose estimation: Detect human body keypoints
🏗️ Advanced Applications: • Security system: Alert when specific objects are detected • Traffic monitoring: Count cars and analyze traffic flow • Inventory management: Automatically count products • Sports analysis: Track players and equipment
📚 Learning Resources: • Ultralytics Documentation: Official guides and tutorials • Computer Vision Courses: Deepen your understanding • GitHub Projects: Explore real-world applications • Community Forums: Connect with other developers
🎊 Congratulations - You're Now an AI Developer!
In just 10 minutes, you've built three different AI applications:
• Image object detection
• Video object detection
• Live webcam detection
You now have the foundation to build amazing computer vision projects. The possibilities are endless - from security systems to fun apps, from business solutions to research projects!
🌟 Remember: Every expert was once a beginner. You've taken the first step into the exciting world of AI and computer vision. Keep experimenting, keep learning, and most importantly - have fun building cool stuff! 🚀