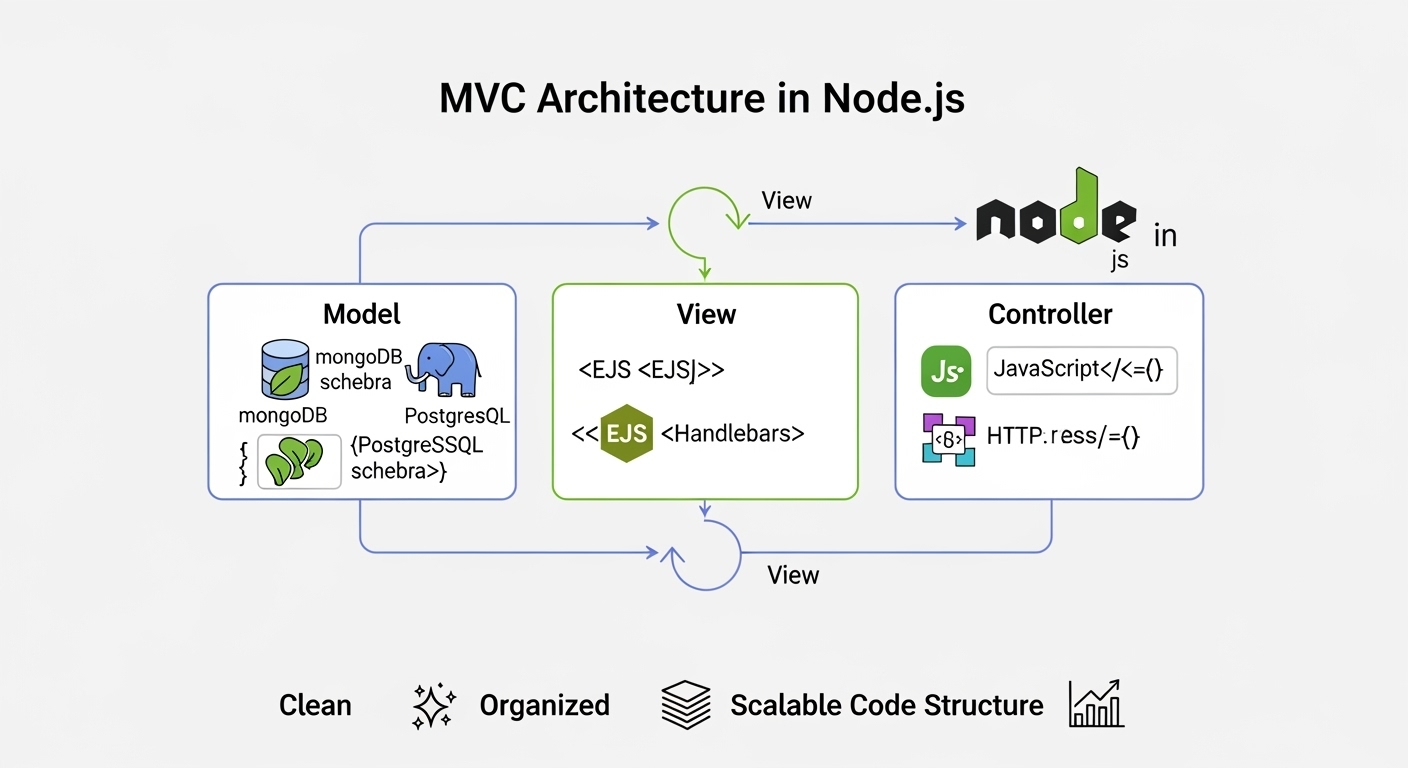
🏗️ What is MVC Architecture?
MVC is like organizing your home into different rooms. Just like you have a kitchen for cooking, a living room for relaxing, and a bedroom for sleeping, MVC organizes your code into three separate areas:
• Model = Kitchen (where data is prepared) • View = Living Room (where things are displayed nicely) • Controller = You (the person who controls everything)
This makes your code clean, organized, and easy to understand! 🏠
🤔 Why Do We Need MVC?
Imagine if you cooked, ate, and slept all in one room. It would be messy and confusing! Similarly, without MVC, all your code would be mixed together in one big mess.
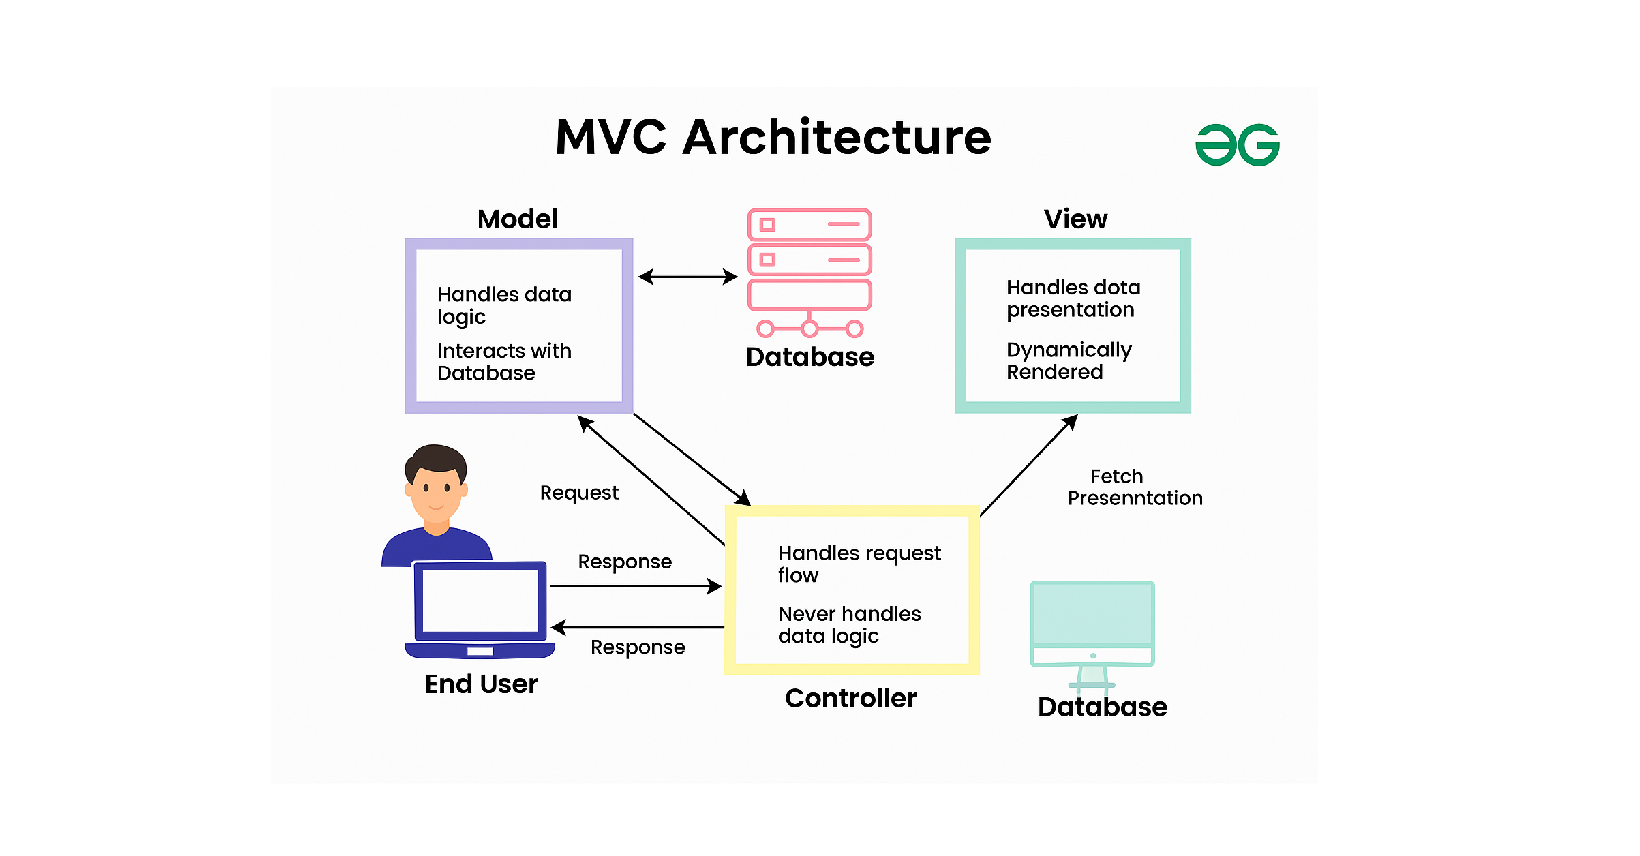
MVC solves this by giving each type of code its own special place:
• Database stuff goes in Model
• HTML/Display stuff goes in View
• Logic/Control stuff goes in Controller
Result? Clean, organized, easy-to-fix code! ✨
🍽️ The Simple Restaurant Story
Let's understand MVC with a simple restaurant story:
You're hungry and want pizza 🍕. Here's what happens:
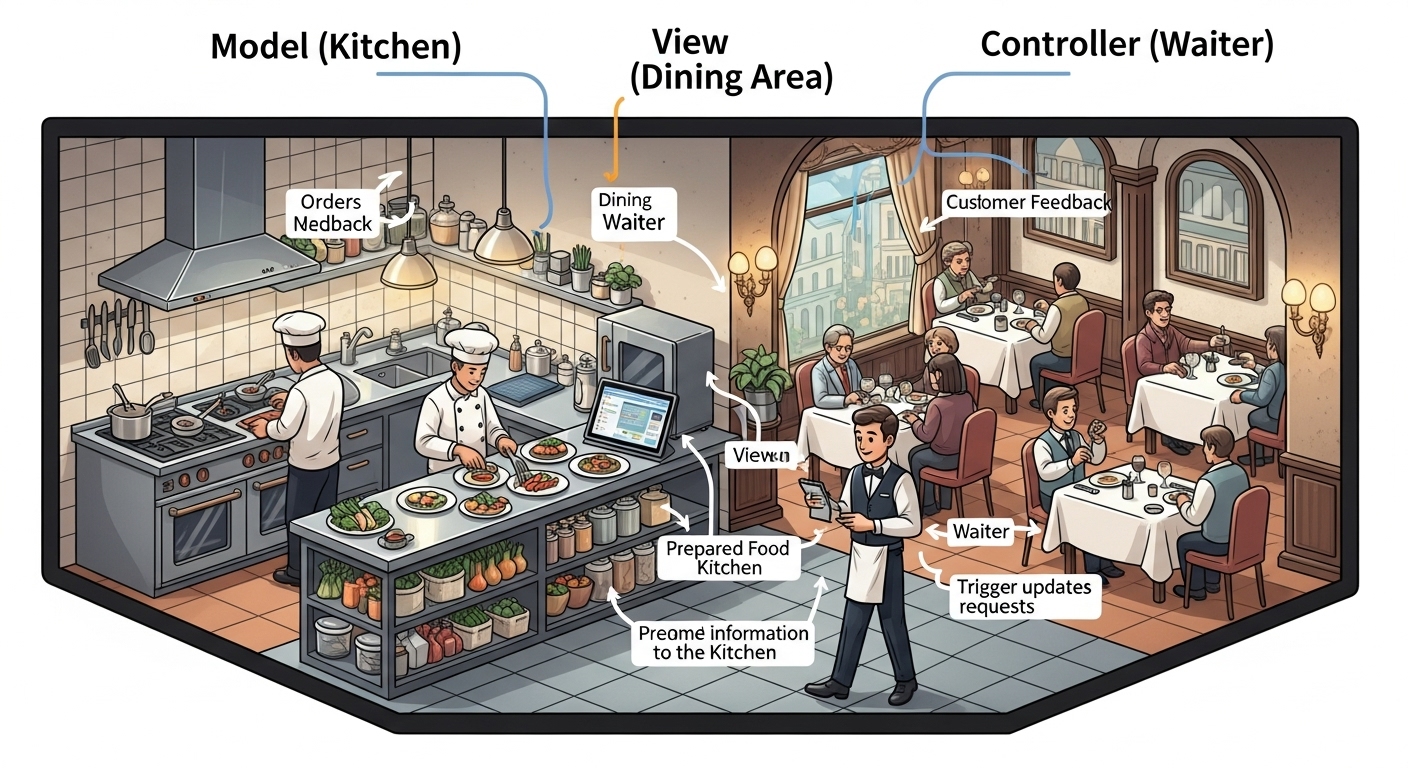
👨🍳 Model (The Kitchen) • Has all the ingredients (data) • Knows how to make pizza (business logic) • Stores recipes and food information • You never see inside the kitchen, but it does the work
🍽️ View (Your Table) • Where your delicious pizza is presented • Beautiful plate, nice setup • What you actually see and enjoy • Just displays things, doesn't cook anything
👨💼 Controller (The Waiter) • Takes your pizza order • Tells the kitchen what to make • Brings the pizza to your table • Coordinates between you, kitchen, and table
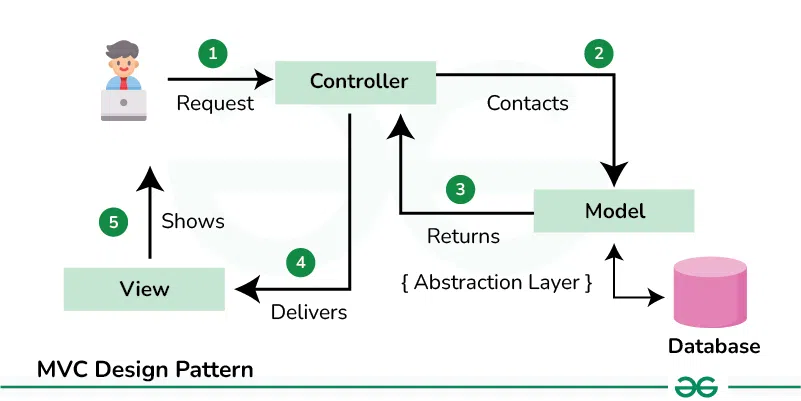
The Magic Flow:
- You tell the waiter what you want
- Waiter tells the kitchen to make it
- Kitchen prepares your pizza
- Waiter brings pizza to your table
- You enjoy your pizza! 🎉
🎯 Why Should You Use MVC?
1. Everything Has Its Place 📂 • Just like organizing your closet • HTML stuff goes in View • Database stuff goes in Model • Control logic goes in Controller • No more searching for code!
2. Easy to Fix Problems 🔧 • If display is broken → Check View • If data is wrong → Check Model • If logic is wrong → Check Controller • Like knowing which room to clean when it's messy
3. Easy to Add New Features ➕ • Want a new page? Add a new View • Want new data? Add to Model • Want new functionality? Add to Controller • Like adding a new room to your house
4. Team Work Made Easy 👥 • One person works on Views (frontend) • Another person works on Models (database) • Someone else works on Controllers (logic) • No more stepping on each other's toes!
📁 How to Organize Your MVC Project
Think of your project like organizing a house with labeled rooms:
1
2
3
4
5
6
7
8
9
10
11
12
my-simple-blog/
├── models/              🗄️ Kitchen (Data & Business Logic)
│   └── blog.js             How to handle blog data
├── views/               👀 Living Room (What users see)
│   └── blog-list.html      Beautiful HTML pages
├── controllers/         🎮 Control Center (Coordinates everything)
│   └── blogController.js   Takes requests, manages flow
├── public/              📁 Static Files (CSS, Images, JS)
│   ├── style.css           Make things look pretty
│   └── app.js              Frontend JavaScript
├── package.json         📄 Project Info & Dependencies
└── app.js              🚀 Main Entry Point
Simple Rule: Each folder has ONE job, just like each room in your house! �
🚀 Baby Steps: Building Your First MVC App
Let's build a super simple blog app to understand MVC. Don't worry, we'll keep it REALLY simple! 😊
Step 1: Create Your Project 🏗️
1
2
3
4
5
6
7
8
9
10
11
12
# Create a new folder
mkdir simple-blog
cd simple-blog

# Start a new Node.js project
npm init -y

# Install Express (web framework)
npm install express

# Create our MVC folders
mkdir models views controllers public
Step 2: Create the Main App (app.js) 🚀
This is like the main entrance to your house - it connects everything:
1
2
3
4
5
6
7
8
9
10
11
12
13
14
15
16
17
18
19
20
21
// app.js - The main entry point (like your house's front door)
const express = require('express');
const blogController = require('./controllers/blogController');

const app = express();

// Setup view engine to render HTML
app.set('view engine', 'ejs');
app.set('views', './views');

// Serve static files (CSS, images)
app.use(express.static('public'));

// Simple routes - like house directions
app.get('/', blogController.getAllBlogs);        // Show all blogs
app.get('/blog/:id', blogController.getBlog);    // Show one blog

// Start the server
app.listen(3000, () => {
  console.log('🎉 Server running at http://localhost:3000');
});
Step 3: Create the Model (Kitchen) 👨🍳
The Model handles data - like a kitchen storing ingredients:
1
2
3
4
5
6
7
8
9
10
11
12
13
14
15
16
17
18
19
20
21
22
23
24
25
26
27
28
29
30
31
32
33
34
35
36
37
38
39
40
41
42
43
44
45
46
47
48
49
50
// models/blog.js - The Model (Kitchen - handles data)

// Fake data (like ingredients in the kitchen)
const blogs = [
  {
    id: 1,
    title: 'My First Blog',
    content: 'This is my very first blog post! I am learning MVC.',
    author: 'John'
  },
  {
    id: 2,
    title: 'Learning Node.js',
    content: 'Node.js is awesome! I can build web applications.',
    author: 'Jane'
  },
  {
    id: 3,
    title: 'MVC is Easy',
    content: 'Once you understand MVC, everything makes sense!',
    author: 'Bob'
  }
];

// Functions to work with data (like recipes)
function getAllBlogs() {
  return blogs;  // Return all blogs
}

function getBlogById(id) {
  return blogs.find(blog => blog.id == id);  // Find specific blog
}

function addBlog(title, content, author) {
  const newBlog = {
    id: blogs.length + 1,
    title: title,
    content: content,
    author: author
  };
  blogs.push(newBlog);
  return newBlog;
}

// Export functions so others can use them
module.exports = {
  getAllBlogs,
  getBlogById,
  addBlog
};
Step 4: Create the Controller (Waiter) 👨💼
The Controller coordinates everything - like a waiter taking orders:
1
2
3
4
5
6
7
8
9
10
11
12
13
14
15
16
17
18
19
20
21
22
23
24
25
26
27
28
29
30
31
32
33
34
35
36
// controllers/blogController.js - The Controller (Waiter - coordinates everything)

const blogModel = require('../models/blog');

// Function to show all blogs
function getAllBlogs(req, res) {
  // 1. Ask the Model (kitchen) for data
  const blogs = blogModel.getAllBlogs();

  // 2. Send data to View (dining table) for display
  res.render('blog-list', { blogs: blogs });
}

// Function to show one specific blog
function getBlog(req, res) {
  // 1. Get the blog ID from the URL
  const blogId = req.params.id;

  // 2. Ask the Model for specific blog
  const blog = blogModel.getBlogById(blogId);

  // 3. Check if blog exists
  if (blog) {
    // Send blog to View for display
    res.render('blog-detail', { blog: blog });
  } else {
    // Blog not found
    res.status(404).send('Blog not found!');
  }
}

// Export functions
module.exports = {
  getAllBlogs,
  getBlog
};
Step 5: Create the Views (Dining Table) 🍽️
Views are what users see - like a nicely set dining table:
First, install EJS template engine:
1
npm install ejsCreate a view to show all blogs:
1
2
3
4
5
6
7
8
9
10
11
12
13
14
15
16
17
18
19
20
21
22
23
24
25
26
27
28
29
30
31
32
33
34
35
<!-- views/blog-list.ejs - Shows all blogs (like a menu) -->
<!DOCTYPE html>
<html lang="en">
<head>
    <meta charset="UTF-8">
    <meta name="viewport" content="width=device-width, initial-scale=1.0">
    <title>My Simple Blog</title>
    <style>
        body { font-family: Arial, sans-serif; margin: 40px; background: #f5f5f5; }
        .container { max-width: 800px; margin: 0 auto; background: white; padding: 20px; border-radius: 10px; }
        .blog-item { padding: 20px; margin: 10px 0; border: 1px solid #ddd; border-radius: 5px; }
        .blog-title { color: #2c3e50; text-decoration: none; font-size: 24px; }
        .blog-title:hover { color: #3498db; }
        .blog-author { color: #7f8c8d; font-style: italic; }
        h1 { text-align: center; color: #2c3e50; }
    </style>
</head>
<body>
    <div class="container">
        <h1>🎉 Welcome to My Simple Blog</h1>

        <% if (blogs.length > 0) { %>
            <% blogs.forEach(function(blog) { %>
                <div class="blog-item">
                    <h2><a href="/blog/<%= blog.id %>" class="blog-title"><%= blog.title %></a></h2>
                    <p><%= blog.content.substring(0, 100) %>...</p>
                    <p class="blog-author">By: <%= blog.author %></p>
                </div>
            <% }); %>
        <% } else { %>
            <p>No blogs found. Time to write your first blog!</p>
        <% } %>
    </div>
</body>
</html>
Create a view to show one specific blog:
1
2
3
4
5
6
7
8
9
10
11
12
13
14
15
16
17
18
19
20
21
22
23
24
25
26
27
28
29
30
<!-- views/blog-detail.ejs - Shows one blog in detail -->
<!DOCTYPE html>
<html lang="en">
<head>
    <meta charset="UTF-8">
    <meta name="viewport" content="width=device-width, initial-scale=1.0">
    <title><%= blog.title %> - My Blog</title>
    <style>
        body { font-family: Arial, sans-serif; margin: 40px; background: #f5f5f5; }
        .container { max-width: 800px; margin: 0 auto; background: white; padding: 40px; border-radius: 10px; }
        .blog-title { color: #2c3e50; border-bottom: 3px solid #3498db; padding-bottom: 10px; }
        .blog-content { line-height: 1.6; font-size: 18px; margin: 20px 0; }
        .blog-author { color: #7f8c8d; font-style: italic; font-size: 16px; }
        .back-link { color: #3498db; text-decoration: none; font-weight: bold; }
        .back-link:hover { text-decoration: underline; }
    </style>
</head>
<body>
    <div class="container">
        <a href="/" class="back-link">← Back to All Blogs</a>

        <h1 class="blog-title"><%= blog.title %></h1>
        <p class="blog-author">Written by: <%= blog.author %></p>

        <div class="blog-content">
            <p><%= blog.content %></p>
        </div>
    </div>
</body>
</html>
Step 6: Test Your MVC App 🧪
Time to see your MVC app in action!
1
2
3
4
5
6
7
# Start your server
node app.js

# Open your browser and visit:
# http://localhost:3000         <- See all blogs
# http://localhost:3000/blog/1  <- See blog with ID 1
# http://localhost:3000/blog/2  <- See blog with ID 2
🎉 Congratulations! You Built Your First MVC App! 🎊
What you just built: • Model: Handles blog data (like a kitchen storing ingredients) • View: Shows beautiful web pages (like a nicely set dining table) • Controller: Coordinates between Model and View (like a helpful waiter)
Your app can: ✅ Show all blogs on the homepage ✅ Show individual blog details ✅ Handle URLs nicely ✅ Look good with simple CSS
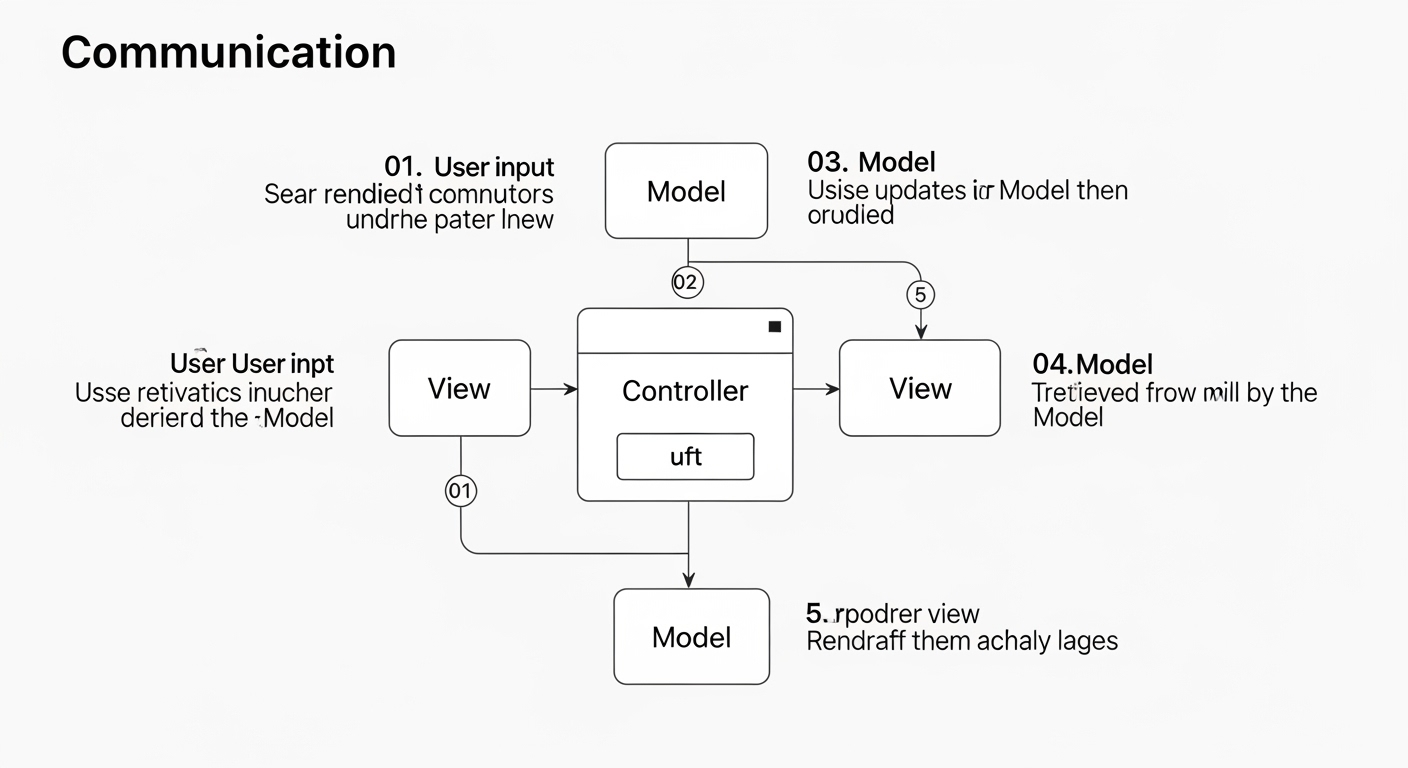
🔄 How Your MVC App Works
When someone visits your website, here's what happens:
Example: User visits /blog/1
- Browser → "I want to see blog #1"
- Express App → "Let me check my routes... ah, this goes to blogController.getBlog"
- Controller → "Hey Model, get me blog #1"
- Model → "Here's blog #1 data"
- Controller → "Hey View, display this blog data nicely"
- View → "Here's a beautiful HTML page with the blog!"
- Browser → Shows the pretty page to the user
It's like a well-organized relay race! 🏃♀️➡️🏃♂️➡️🏃♀️
🎯 Simple MVC Best Practices
For Models (Kitchen) 🗄️ • Keep all data-related stuff here • Don't put HTML or display logic • Think of it as your data chef
For Views (Dining Table) 👀 • Only put HTML and display code • Don't put business logic or database queries • Think of it as your presentation artist
For Controllers (Waiter) 🎮 • Keep them simple and thin • Just coordinate between Model and View • Don't put heavy business logic here • Think of it as your helpful coordinator
❌ Common Beginner Mistakes (And How to Avoid Them)
❌ Putting everything in one file ✅ Do this instead: Separate into Model, View, Controller
❌ Database queries in Views
✅ Do this instead: Put all data logic in Models
❌ HTML in Models ✅ Do this instead: Keep HTML only in Views
❌ Business logic in Controllers ✅ Do this instead: Keep Controllers simple, put logic in Models
🚀 Next Steps to Level Up
Now that you understand MVC basics, here's what to learn next:
1. Add a Database 💾 • Learn MongoDB with Mongoose • Connect your Model to a real database • No more fake data!
2. Add Forms 📝 • Let users create new blogs • Learn about POST requests • Handle form data safely
3. Add User Authentication 🔐 • Let users sign up and log in • Secure your application • Only allow blog owners to edit their posts
4. Make it Look Beautiful 🎨 • Learn CSS frameworks like Bootstrap • Make responsive designs • Add cool animations
5. Deploy to the Internet 🌍 • Put your app online • Use services like Heroku or Netlify • Share with friends!
🎓 Key Takeaways (Remember These!)
• MVC = Like organizing your house into rooms 🏠 • Model = Kitchen (handles data and business logic) 👨🍳 • View = Dining table (what users see) 🍽️ • Controller = Waiter (coordinates everything) 👨💼 • Benefits = Clean, organized, easy-to-maintain code ✨ • Key Rule = Each part has ONE job only!
Think of MVC as teamwork - everyone has their role! 🤝
� Ready for More Learning?
• Practice: Build more features for your blog app • Database: Learn MongoDB to store real data • Framework: Try different Node.js frameworks • Deploy: Put your app online for others to see • Advanced: Learn about APIs, authentication, and security
Remember: Every expert started as a beginner. Keep practicing, and you'll become amazing at building web applications! 🌟
The most important thing: MVC makes your code organized and professional. It's like having a clean, well-organized workspace - everything has its place, and you can find what you need quickly! �